Saturday, December 4, 2021

How to get or enable Wi-Fi on a desktop PC or laptop for very low price (Windows & Mac)


To get WiFi on your desktop PC or a laptop, first, you guys need to purchase a USB WiFi adapter like this one Amazon US or Amazon IND. In my case, I have purchased the TP links nano wifi adapter, which is a low-cost dual-band (2.4 & 5GHz) USB WiFi adapter.

How to Setup TP-Link Nano AC600 WiFi Adapter (Archer T2U Nano)

To set up the WiFi, first, you need to download the driver from the TP links website or use the CD which comes along with the package

To download the driver go to this link

Next, select the Type as Home and then from the adjacent drop-down select adapters.

In the next, Drop-down select USB adapters

Next, enter your USB adapter model number which you can find on the package

Next, from the options, select your model and then click on it to download the drivers


Next, open the download location on your PC and extract the driver files

Next, insert your USB WiFi adapter and then double click on the setup file to install the driver

How to connect to WiFi Network

To connect to a WiFi network, click on the network icon in Taskbar

Next, enable the WiFi option

Next, click on the right arrow button

Next, select your WiFi network and click on Connect

Next, enter your WiFi network password and click on Next to connect to WiFi

How to share WiFi Connection

To share your WiFi connection, first, right-click on the start button and then go to the settings

Next, go to network and internet

Next, click on Mobile Hotspot

Next, under properties, edit your network name and password


Next, enable the Mobile hotspot by clicking on the toggle button on the settings page or by enabling it in the taskbar


How to disable Wireless communication

To disable all the WiFi connections, just enable the Airplane mode

Thank You For Reading!

Saturday, November 27, 2021

How to create & post grid image for Instagram profile using GIMP Image Editor

To make an Instagram grid to display on your profile, the First thing you need is a square image. The reason for this is, the Instagram grid is square and if you choose any other image size, Instagram will auto adjust to fit the grid shape that is square and the final product won't look good. For this reason, I will be choosing 1080 by 1080 pixels as my single image size, and this size also happens to be one of the popular Instagram image sizes.

Next, we need to calculate what size should be our Instagram grid image. To do that, first, choose the grid look that you want. For this tutorial, I will be using a 2*3 grid.

Now to calculate the Grid Image size, we need to add each single image size. Since I have chosen my grid has 2*3 and my single image size has 1080*1080, my grid image height will be 1080 * 2, which is 2160 and my width will be 1080 * 3, which is 3240

After the calculation, open the GIMP image editor and click on File and then click on New 

Next, enter the image size. In my case Width will be 3240 and my height will be 2160

Next, click on the Advanced option and set the option 'Fill with' to Transparency and then click OK.

Next, go to Image, and then click on Guides and then select the option New Guide 

Next, set the direction as vertical and position value to 1080 and then click on OK

Now repeat the same process, but this time change the position value to 2160

Next, repeat the same process as earlier, but this time set the direction to horizontal and change the position value to 1080

After setting up the guides, drag and drop an image and adjust the position of your image as you want

Next, go to image, and click on 'Slice using Guides' which will create six different images with the size 1080 by 1080 pixels

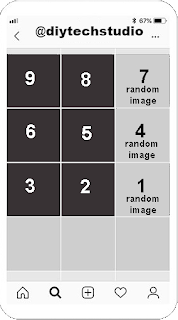
Next, export the images in reverse order and name them starting from 1. To make it easy for you guys, I have numbered them, so just follow the order.

Next, transfer the images to your phone and upload the images one by one starting from 1.

    Note: Do not upload all the images at once. If you upload all the images at once it will create a multipost post and you won't get the grid look

Once you have uploaded all your images, your Instagram grid should look something like this.

Some other grid shape you can try

    3*3 Grid

Grid Shape
Grid Shape

Uploading Pattern


    3*2 Grid Shape

Grid Shape

Uploading Pattern

Thank You For Reading!

Monday, November 15, 2021

How to format SD card the right way | Step-by-Step Guide 2021


To format the SD card the right way, first, download the SD card formatter by clicking here. On the downloads page, scroll down to the SD card formatter section and select the OS you want and then accept the terms and conditions to start your download.

To install the software first Unzip the folder coating the software and then double click on the file to start the installation. After installation, insert an SD card and then open the SD card formatter software.

Next, select the SD card under the select card

Next, select the option, Quick format under formatting options

Next, enter any desired name under the volume label

Next, click on Format to format your SD card

Thank you for Reading!

Thursday, November 11, 2021

How to create a Windows 11 bootable USB drive


To create a Windows 11 bootable USB drive I am using free open-source software called Rufus. To download Rufus please click here, and then scroll down to the bottom of the page and click on Rufus Portable to download it.

Next, download the Windows 11 image file by clicking here

                Read: How to download Windows 11 ISO file

After downloading both Rufus and Windows 11, insert a USB drive with a capacity of more than 8GB

Next, open the RUFUS software and select the USB device if it's not selected

Next, select the option Disk or ISO image which is under boot selection

Next, click on the select button and then select Windows 11 ISO image

Next, under the image option, select standard windows 11 installation if your PC supports TPM 2.0 and Secure boot, or else select Extended windows 11 installation (this option is suitable for old PC).

        Note: Microsoft recommends using TPM 2.0 and the Secure boot option for Windows 11

Next, select the GPT (GUID partition table) option under the partition scheme

Next, select the UEFI option under the target system

Next, enter any name under the volume label

Next, select NTFS as the file system and set the cluster size to 4096 bytes

Next, click on the start button to create a windows 11 bootable USB drive.

Thank you for Reading!